Introduction
In part three of our “Getting Started with IoT and Hardware Hacking” series we will perform firmware analysis to hunt for vulnerabilities in custom firmware we loaded onto a Raspberry Pi. In the first part of the series, we looked at the necessary items to build an affordable toolkit of IoT and hardware hacking gear. In the second part, we set up a Raspberry Pi with custom firmware designed to learn about IoT hacking and learned all about UART.
In this section, we will take a look at how to unpack embedded Linux firmware to extract the various components of the firmware, and identify the files, scripts, binaries, and libraries of interest. In the final part of the series we’ll reverse engineer the binaries and libraries of interest to hunt for a vulnerability.
If you weren’t able to get a Raspberry Pi setup you’ll still be able to follow along with the majority of this blog by making use of a copy of the firmware. You can download it from here: https://github.com/digitalandrew/dumb_thing/releases/tag/v1.0.1.
After downloading make sure you unzip the firmware as well.
unzip dumb_thing_v_1_0_1.zipInitial Firmware Analysis
We’ll get started by performing some initial firmware analysis to get a lay of the land and make sure the firmware sample we’re working with matches what we are expecting.
Since we’re using a Raspberry Pi, the firmware is located on an SD card in .img format. Most commercial IoT devices will use an EPROM chip and the firmware will be in .bin format. So long as the firmware is not encrypted, the steps in this blog will work without much modification for .bin firmware formats as well.
One of the first steps I like to take is to run strings against the firmware to show if some (or all) of the firmware is unencrypted and give some quick details about the contents of the firmware.
strings -n 10 dumb_thing_v_1_0_1.imgYou should see quite a few strings coming through, this is a great indication that there are unencrypted portions of the firmware. Instead of manually filtering through them, we can grep on the results to look for common keywords, such as “Linux” and “version”.
strings dumb_thing_v_1_0_1.img | grep Linux

strings dumb_thing_v_1_0_1.img | grep version
This is still somewhat of a needle in the haystack approach, but it does help to give us some situational awareness about the firmware we are dealing with. For instance, if we didn’t already know, we could see that this is an embedded Linux device.
Before proceeding with manual analysis, we’ll kick off a firmware scan as they can take some time to complete. There are multiple tools available for this, however, in this example, I am using BugProve. If you’d like, you can sign up for a free account and follow along.
https://www.tcm.rocks/bugprove
Start by uploading the dumb_thing firmware. Make sure to upload the .img file.

Click continue to proceed with the scan.

Setup a new project and name it however you’d like.
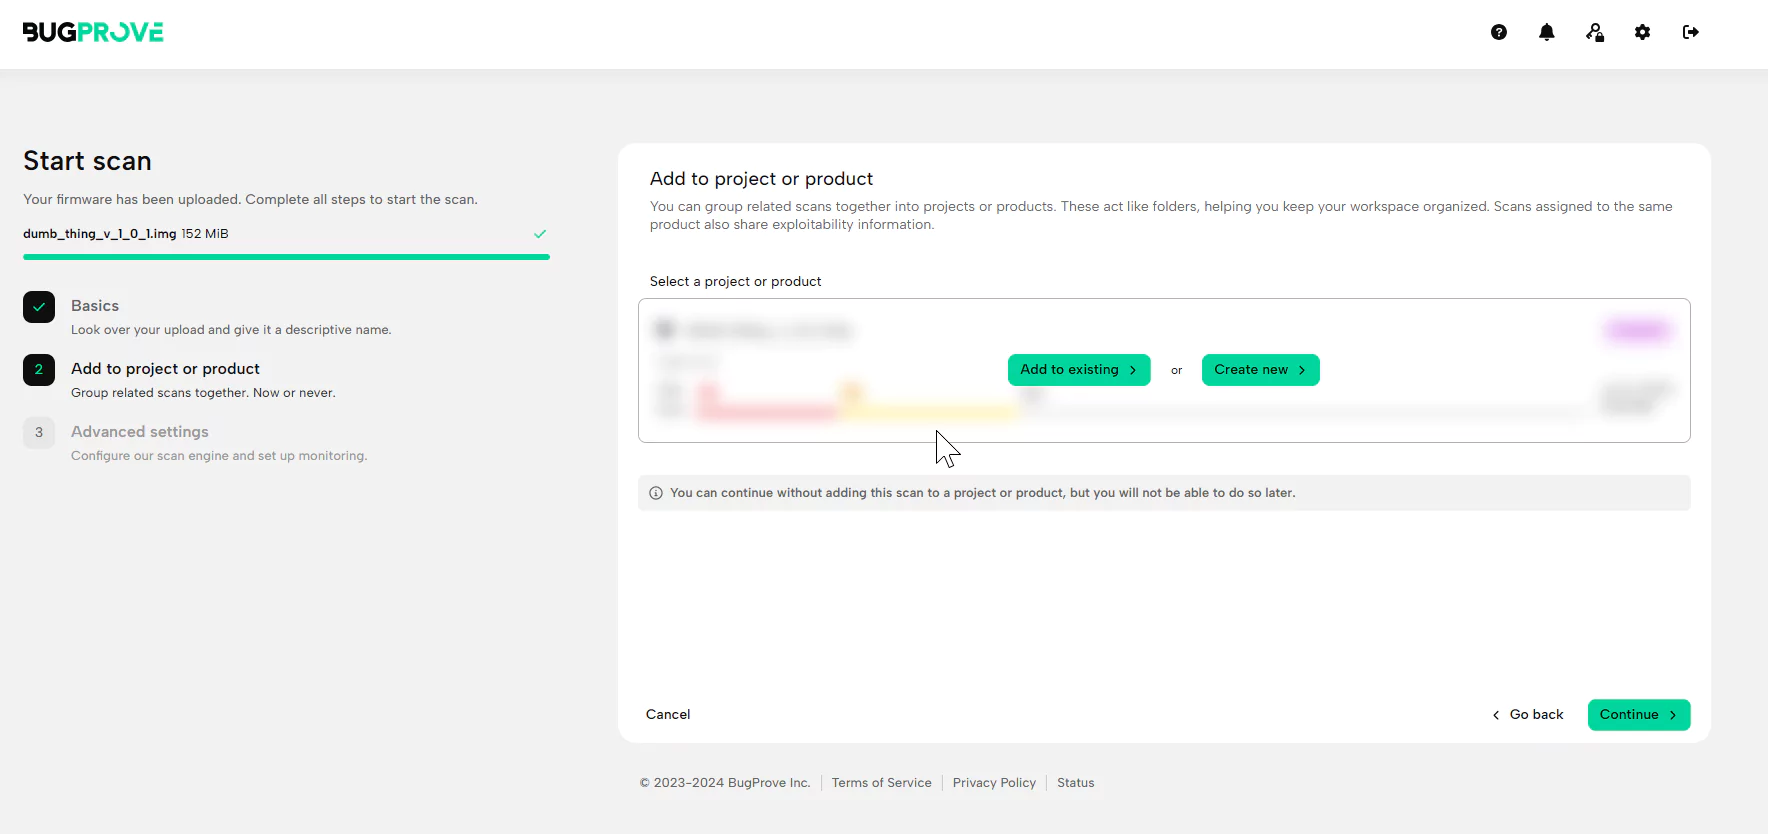
Kick off the scan using the default settings. We’ll come back and look at it after performing some further manual analysis.
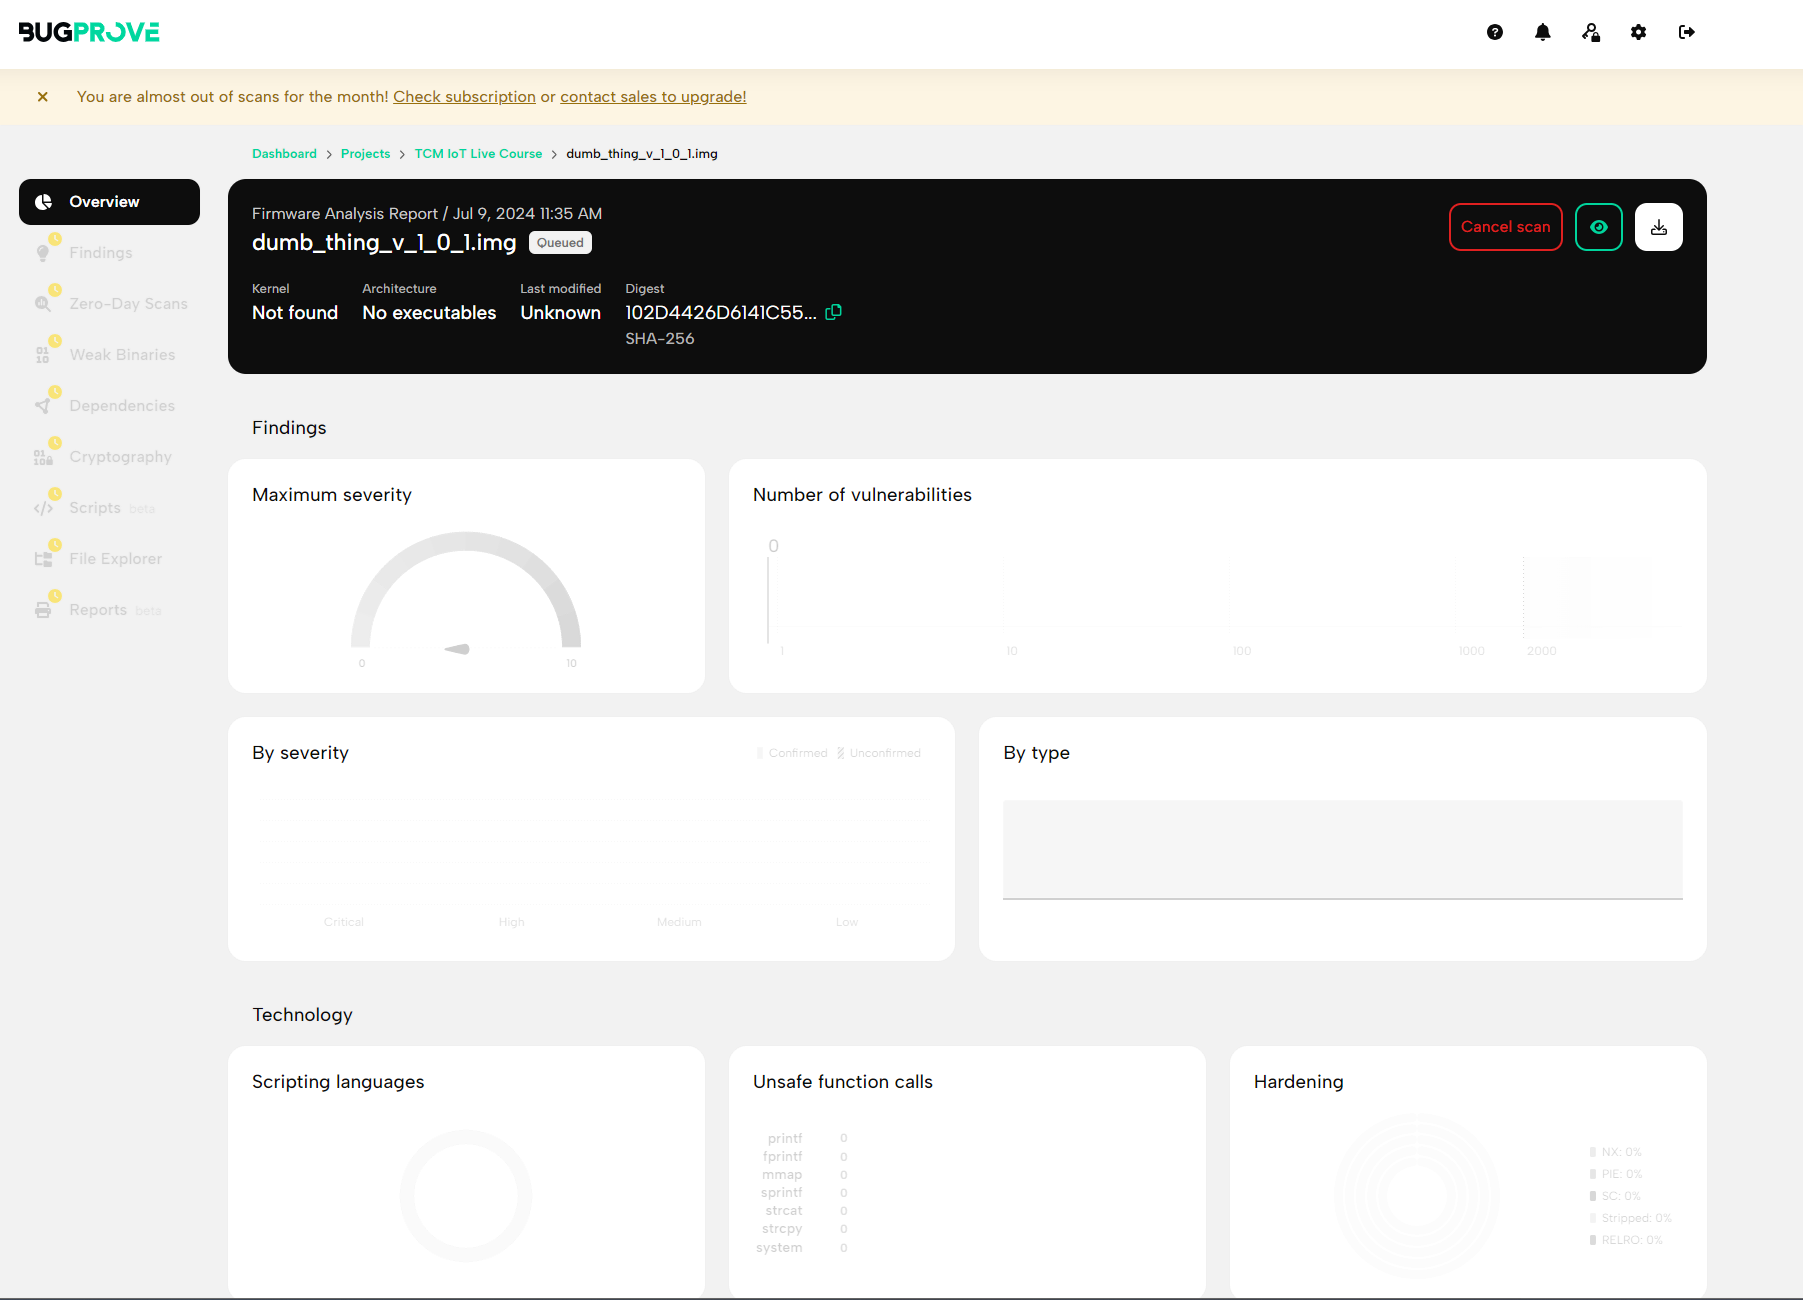
Firmware Analysis with Binwalk
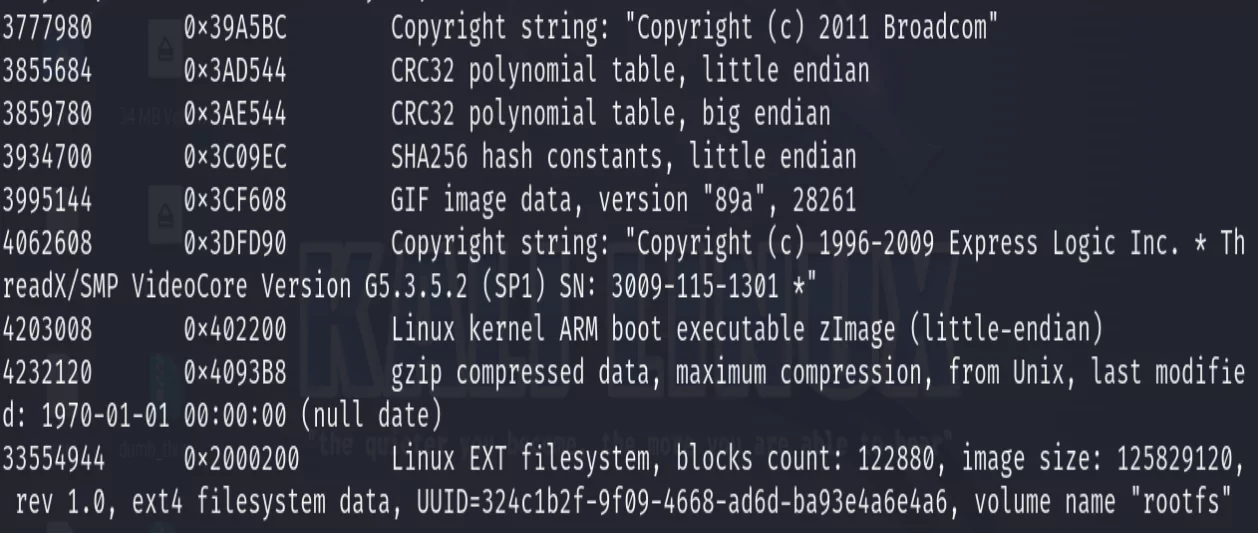
Next, we’ll use Binwalk to scan firmware files and automatically identify the different portions and files of the firmware. It can also go even further and extract them as well. Let’s start by running Binwalk with no options on the firmware image to show the different portions of the firmware that it can identify.
binwalk dumb_thing_v_1_0_1.imgSometimes the output from Binwalk can be quite noisy, so it takes some experience to be able to pick out the sections of interest, such as the two listed near the bottom of the output from this firmware. The first is the Linux Kernel. We can see some details about the architecture it’s been compiled for (ARM Little-Endian). The second section of interest is a Linux EXT file system. This is most likely the root file system which contains all of the files, binaries, scripts, libraries, and more that enable the device to do whatever it’s supposed to do. The root file system is usually of the most interest to IoT hackers as we’re after those files to hunt for vulnerabilities. On commercial devices you’ll frequently see other filesystems used, SquashFS is a very popular one. Luckily, Binwalk can still easily work with most of these file systems out of the box.
Another useful function of Binwalk is to check the entropy of the file. This can help to identify encrypted or compressed sections of the file that Binwalk was not able to automatically detect.
binwalk -E dumb_thing_v_1_0_1.imgThe entropy calculates the randomness of the file. Data that is either compressed or encrypted (random) will have an entropy very close to or exactly at 1, data that is close to or exactly 0 will have no randomness and is most likely empty sections of the file. Data that fluctuates somewhere in between is most likely unencrypted.
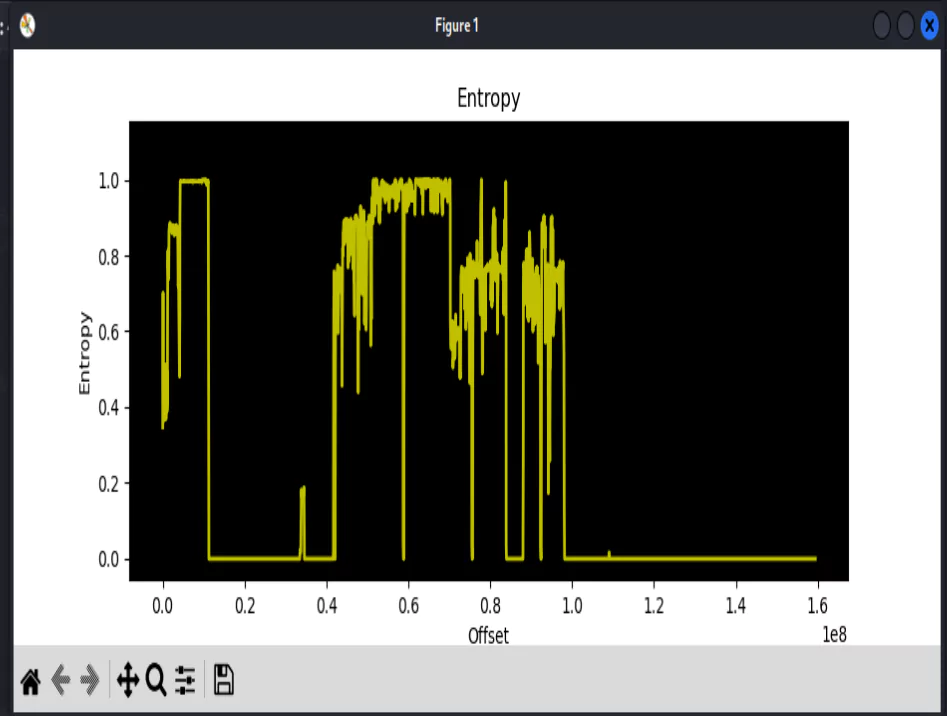
In this example, Binwalk was able to identify the sections of the firmware that were required. However this won’t always be the case, so it’s a good idea to check over the entropy to see if there are any obvious sections that the automated analysis missed out on.
Finally, Binwalk can be used to extract the contents of the firmware, including the root file system we are after.
binwalk -e dumb_thing_v_1_0_1.img

cd ext-root

ls
You should now be looking at the root file system for this device.
Manual Enumeration of Root File System
If you’re familiar with Linux file systems, you’ll notice that since this is an embedded Linux device, the root file system layout closely resembles a more standard Linux system. The next step we’ll take is to perform a more manual approach to enumeration of this file system. For a thorough review of the device, a full enumeration of the file system would be prudent, however in this example I’ll showcase some strategies and commands to speed this up and look in the places most likely to yield results.
Investigation Using Linux Commands
A very useful command for searching through the file system is the find command, it can be used to search for files with a specific extension.
find -name "*.xml"The above example will show all .xml files which are a popular format in IoT devices for configuration files. These configuration files can contain juicy details like endpoints, usernames, or even passwords/keys.
We can also revisit the strings command now that the file system has been decompressed by Binwalk. This will reveal more strings that may not have been accessible before while the file system was unpacked. Again, we will pipe the results of strings into grep to look for specific keywords of interest.
strings -f * | grep "psk"The above example will give hits for the wpa_supplicant file which is what stores the wifi configuration for the device.
Grepping on “psk” is just one quick example of the many keywords we can search for, including “password”, “username”, and “API”.
One folder I always thoroughly check through is the “etc” (editable text configurations) folder, which contains the majority of the configuration files in Linux. One of those files of interest is the “shadow” file which contains the hashed passwords for the accounts.
cd etc

cat shadow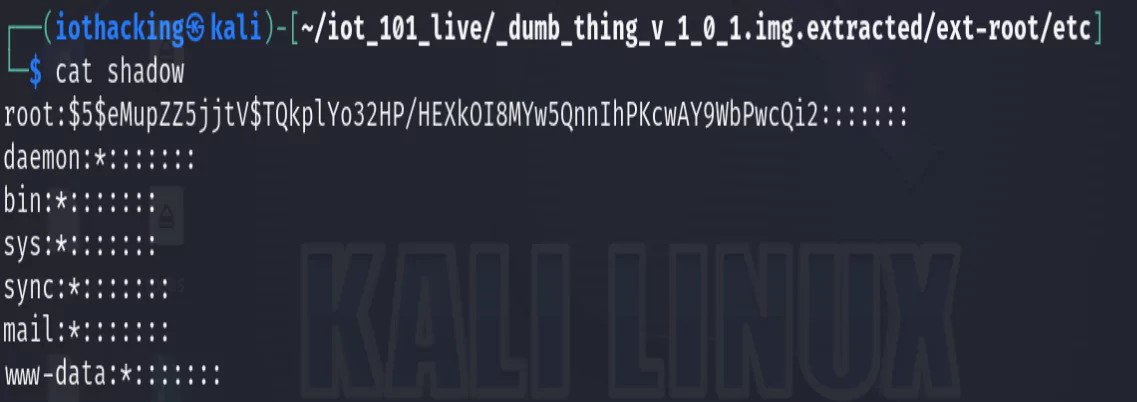
In this example, the root password is already known as it was provided. However if we didn’t know it, we could attempt to crack the hash to obtain it. The root password could then be used to login via UART or possibly even SSH or Telnet.
Cracking Passwords with Hashcat
Let’s take a quick look at how we could crack this hash. Usually when I find hashes of interest in firmware I’ll save them in a file. I’d suggest creating one in a folder outside of the firmware directory itself that we’re currently working in.
In my example, I’m running Hashcat on a Kali VM. Usually this isn’t advisable as it will be slow and doesn’t make the best use of computing resources, however, the password is fairly simple and we’ll make use of a small word list as this is just a demonstration.
I created a wordlist with the following words:
iot
test
1234
root
admin
password
tcm
Now using that word list we can attempt to crack the hash with:
hashcat -a 0 -m 7400 root.hash wordlist.txtThe -m 7400 portion of the script is what tells Hashcat what type of hash is being cracked and which module it should use. If you’re not sure which module to use for a hash, I usually check the help command for Hashcat and look through the example hashes.
Finding Gems in inittab
Another file that I always check the contents of is the inittab file. This is the configuration file responsible for launching binaries and daemons on system startup.
cat inittab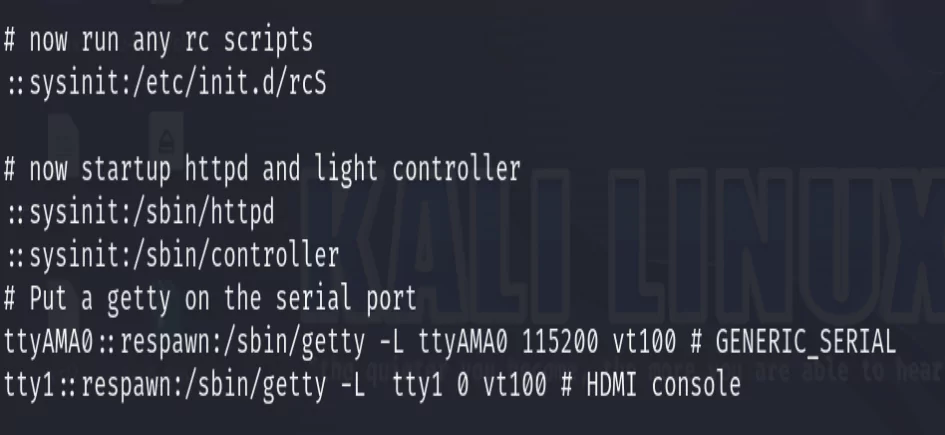
Reading through the file there are multiple lines of interest. The first one is the call to run the init process init.d which will call all of the initialization scripts which run at startup to configure the system. We’ll take note of that and look at them next. Second, we see the httpd and controller binaries starting up, we should also take note of these binaries to review later. Finally, we see how the UART serial prompt is launched with getty.
Most embedded Linux devices use busybox as their init process which will run init.d/rcS which then calls all of the scripts inside init.d/ that begin with S in alpha-numeric order. These scripts can be an easy win since they are not compiled we can simply read through them. Also, since they are used to setup the system they can contain a lot of important details about how the system functions. In this example, we’ll just take a look at S92synchTime,sh, however I’d suggest looking through all of them.
cat S92synchTime.shThis is a fairly basic script that gets the time from a public API, parses it with JSON to get the datetime, and then passes this into the setTime.sh script. While this may seem harmless, we aren’t using https and also don’t have up-to-date certificates on our device regardless.
Finding a setTime Vulnerability
Let’s further take a look at the setTime.sh script.
cat setTime.sh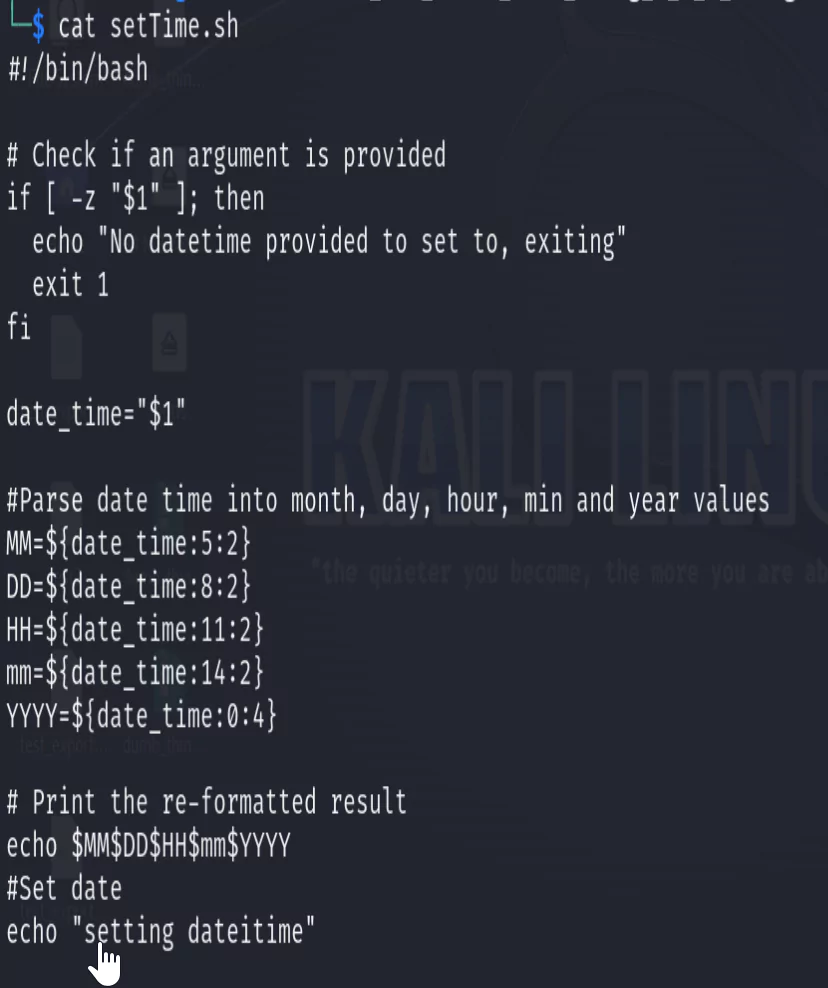
Further analyzing this script we see the datetime passed in is used to set the date. Since this is coming from a potentially untrusted endpoint, we are processing untrusted data. This leaves the device vulnerable to a man-in-the-middle attack which could impersonate the endpoint and instead send in a command injection or other malicious inputs. This is something I hope to demonstrate further in another blog or video. For now, let’s note it down as a finding and move on.
As previously mentioned, there are many places we could and should look if we were performing a full enumeration. However, for this example we’ll now move on to taking a look at the results from BugProve. I’d encourage you to check through the other folders and files in the root file directory on your own and see if you find anything further of interest.
Reviewing BugProve Automated Scan Results
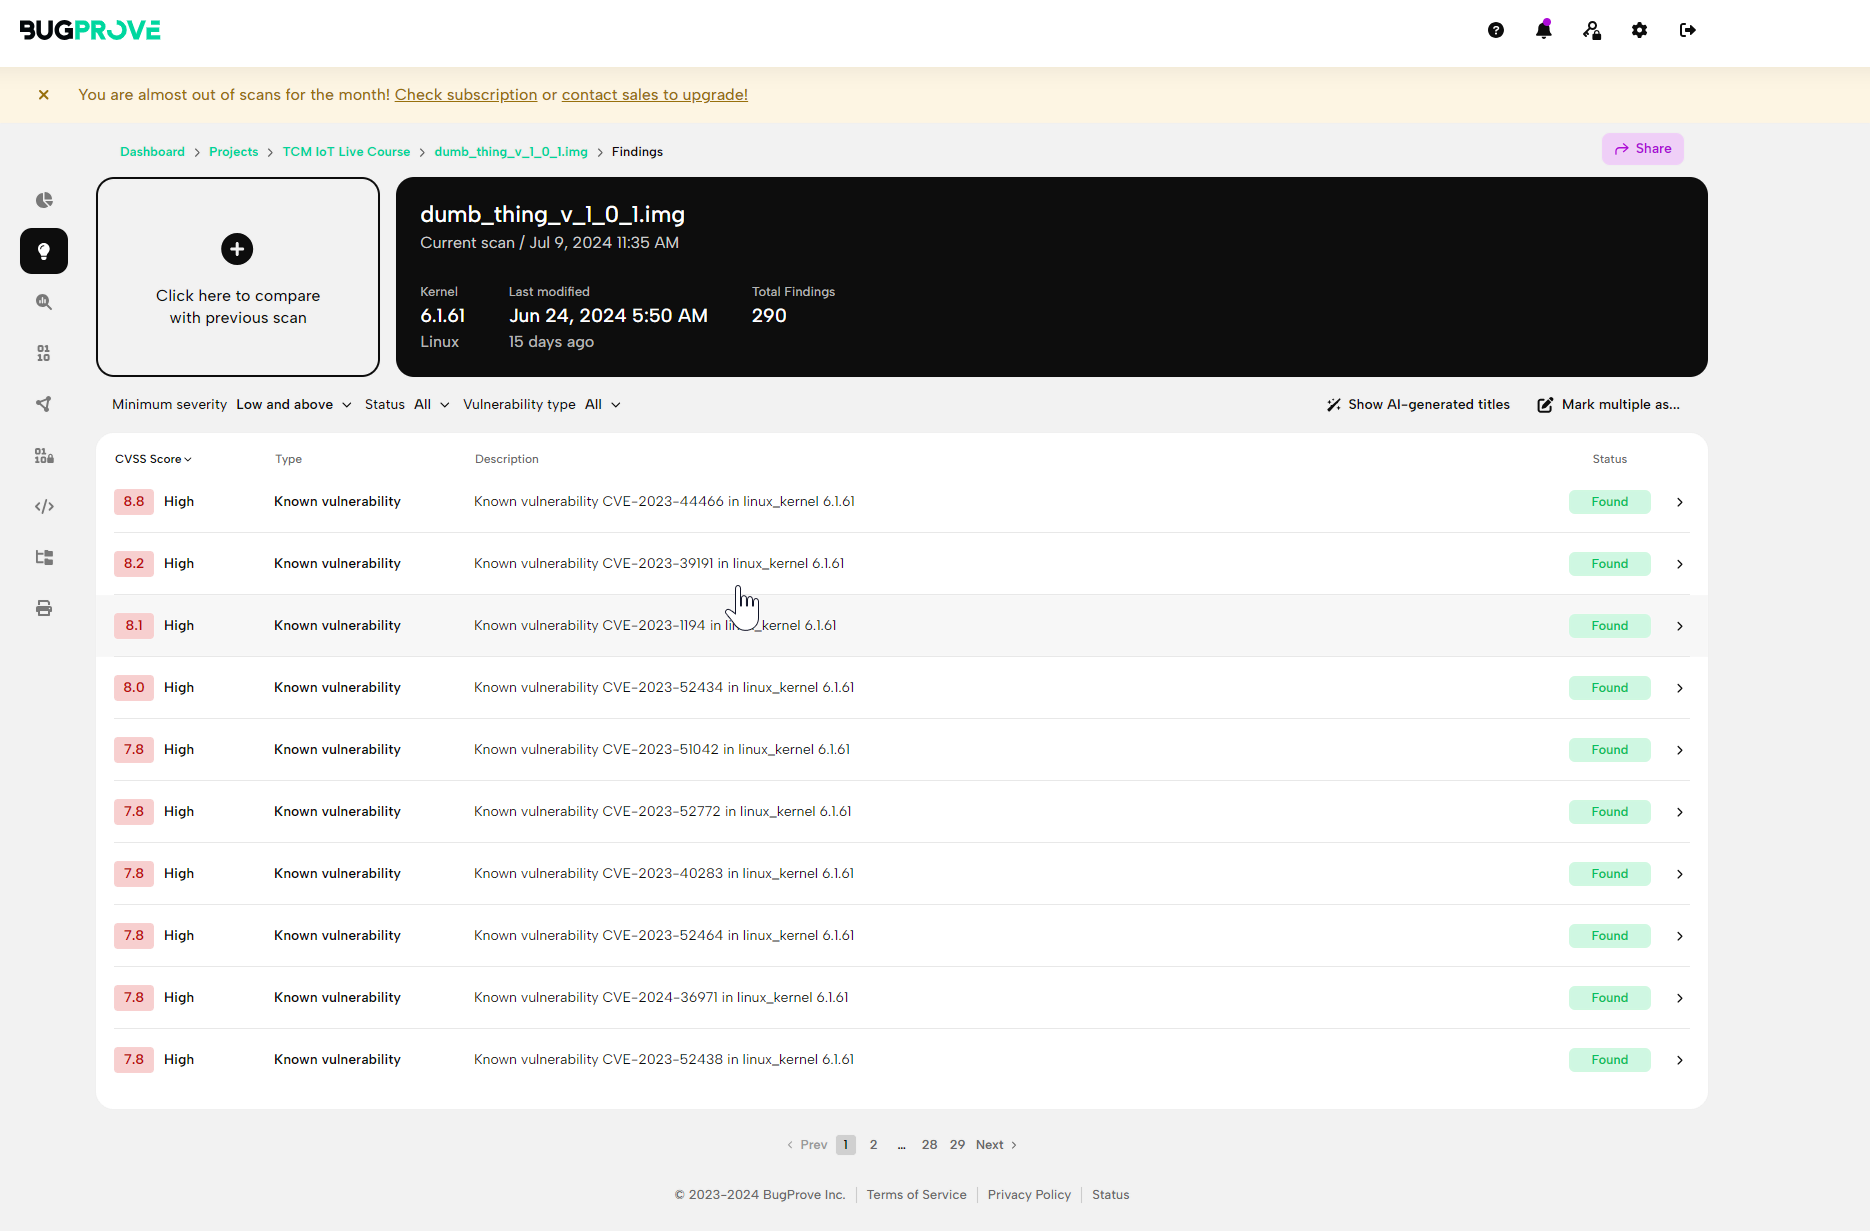
Now that the scans are complete we can check out the results.
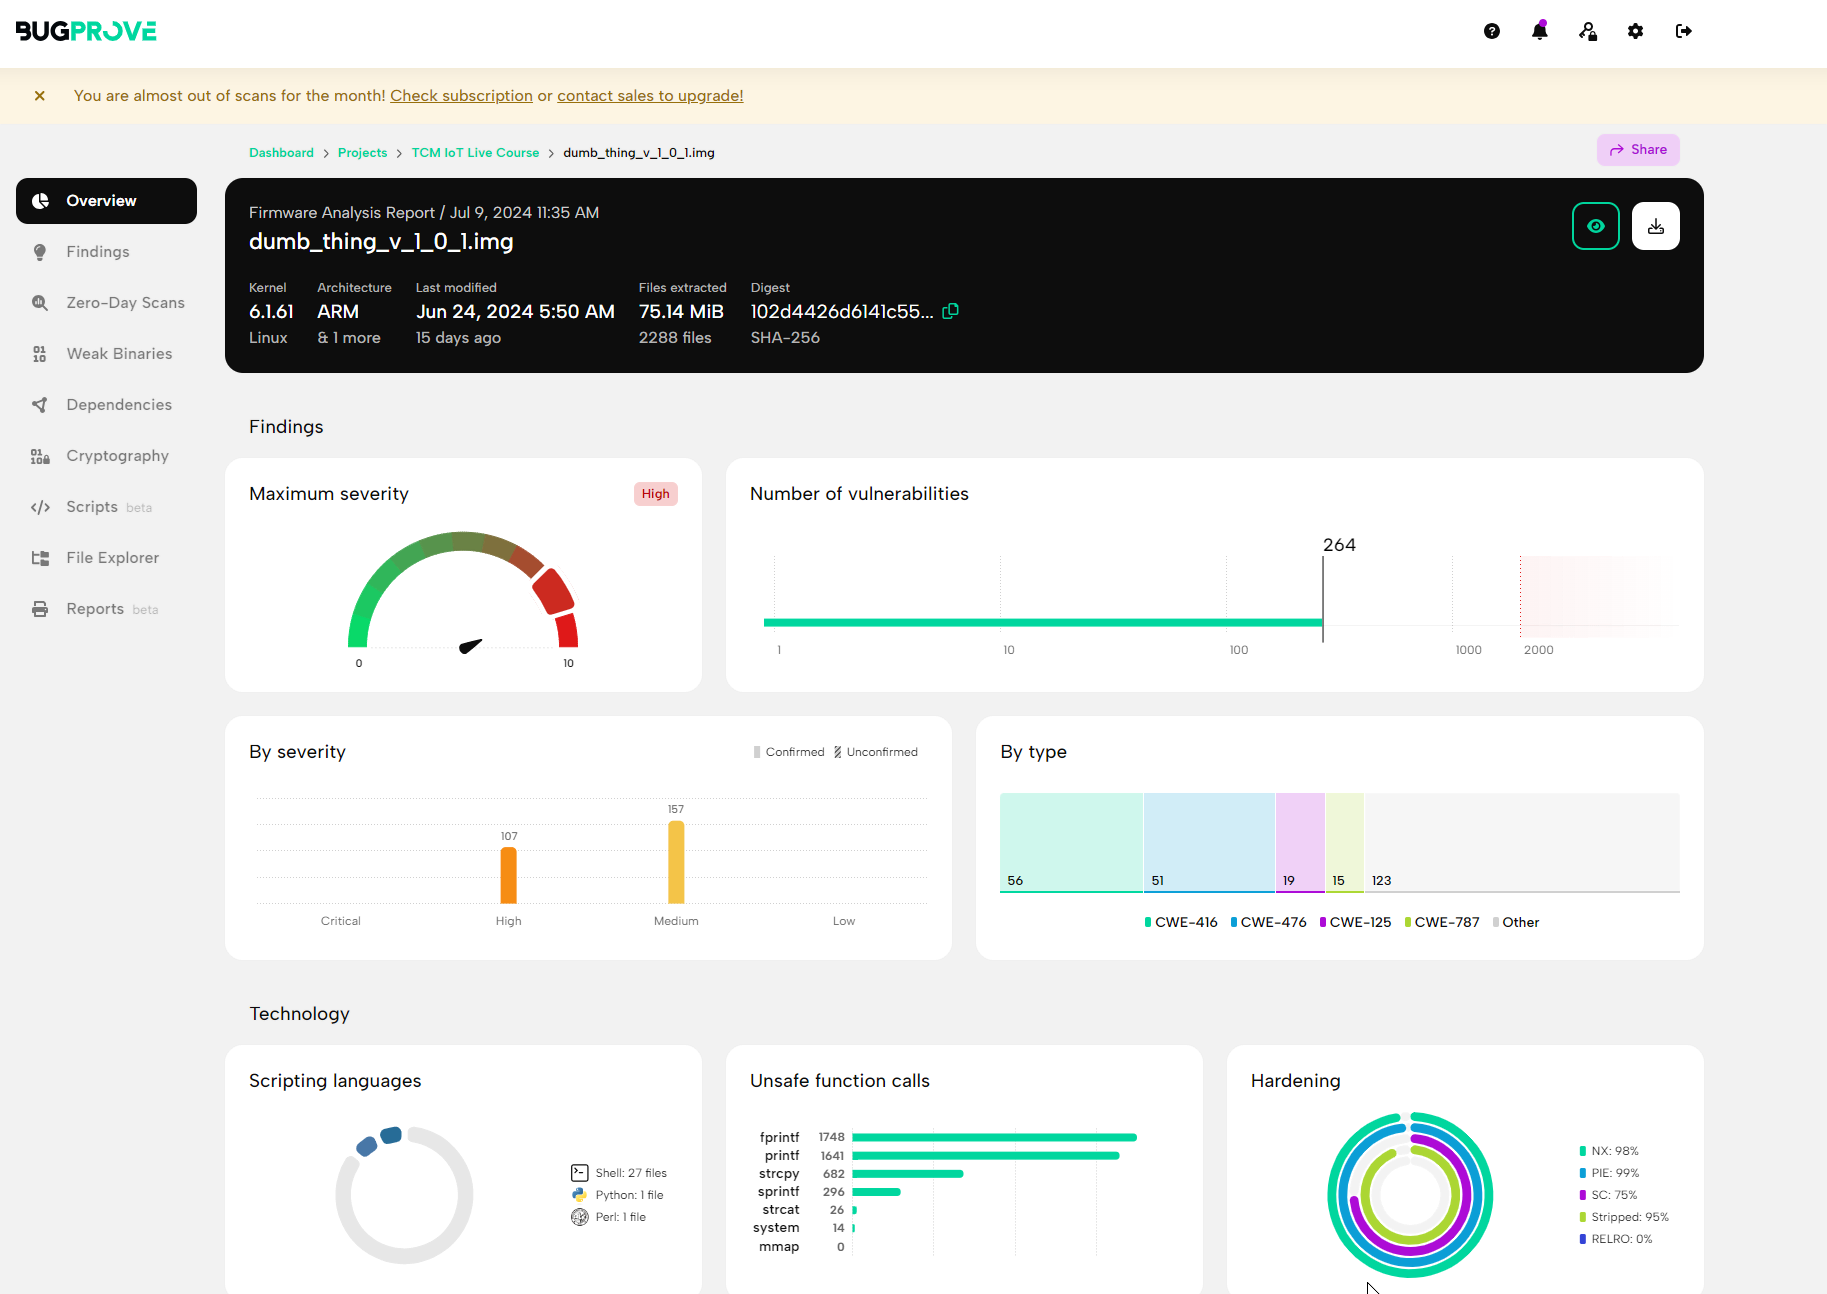
You’ll notice that there are a lot of findings including many high severity ones. However most of these are from the version of the Linux kernel being used. These may or may not be exploitable and could be reviewed further.
In this example, we’re going to be looking for vulnerabilities in the custom binaries and libraries for this device. Results like this can be very useful in a production environment to identify vulnerabilities introduced via dependencies and other software.
We can still use BugProve to help in our hunt for vulnerabilities in the custom binaries and libraries for the device by using the “Weak Binaries” search. This search in BugProve shows binaries that make use of known unsafe function calls such as system calls which could lead to command injection of unsafe string functions that can lead to buffer overflows.
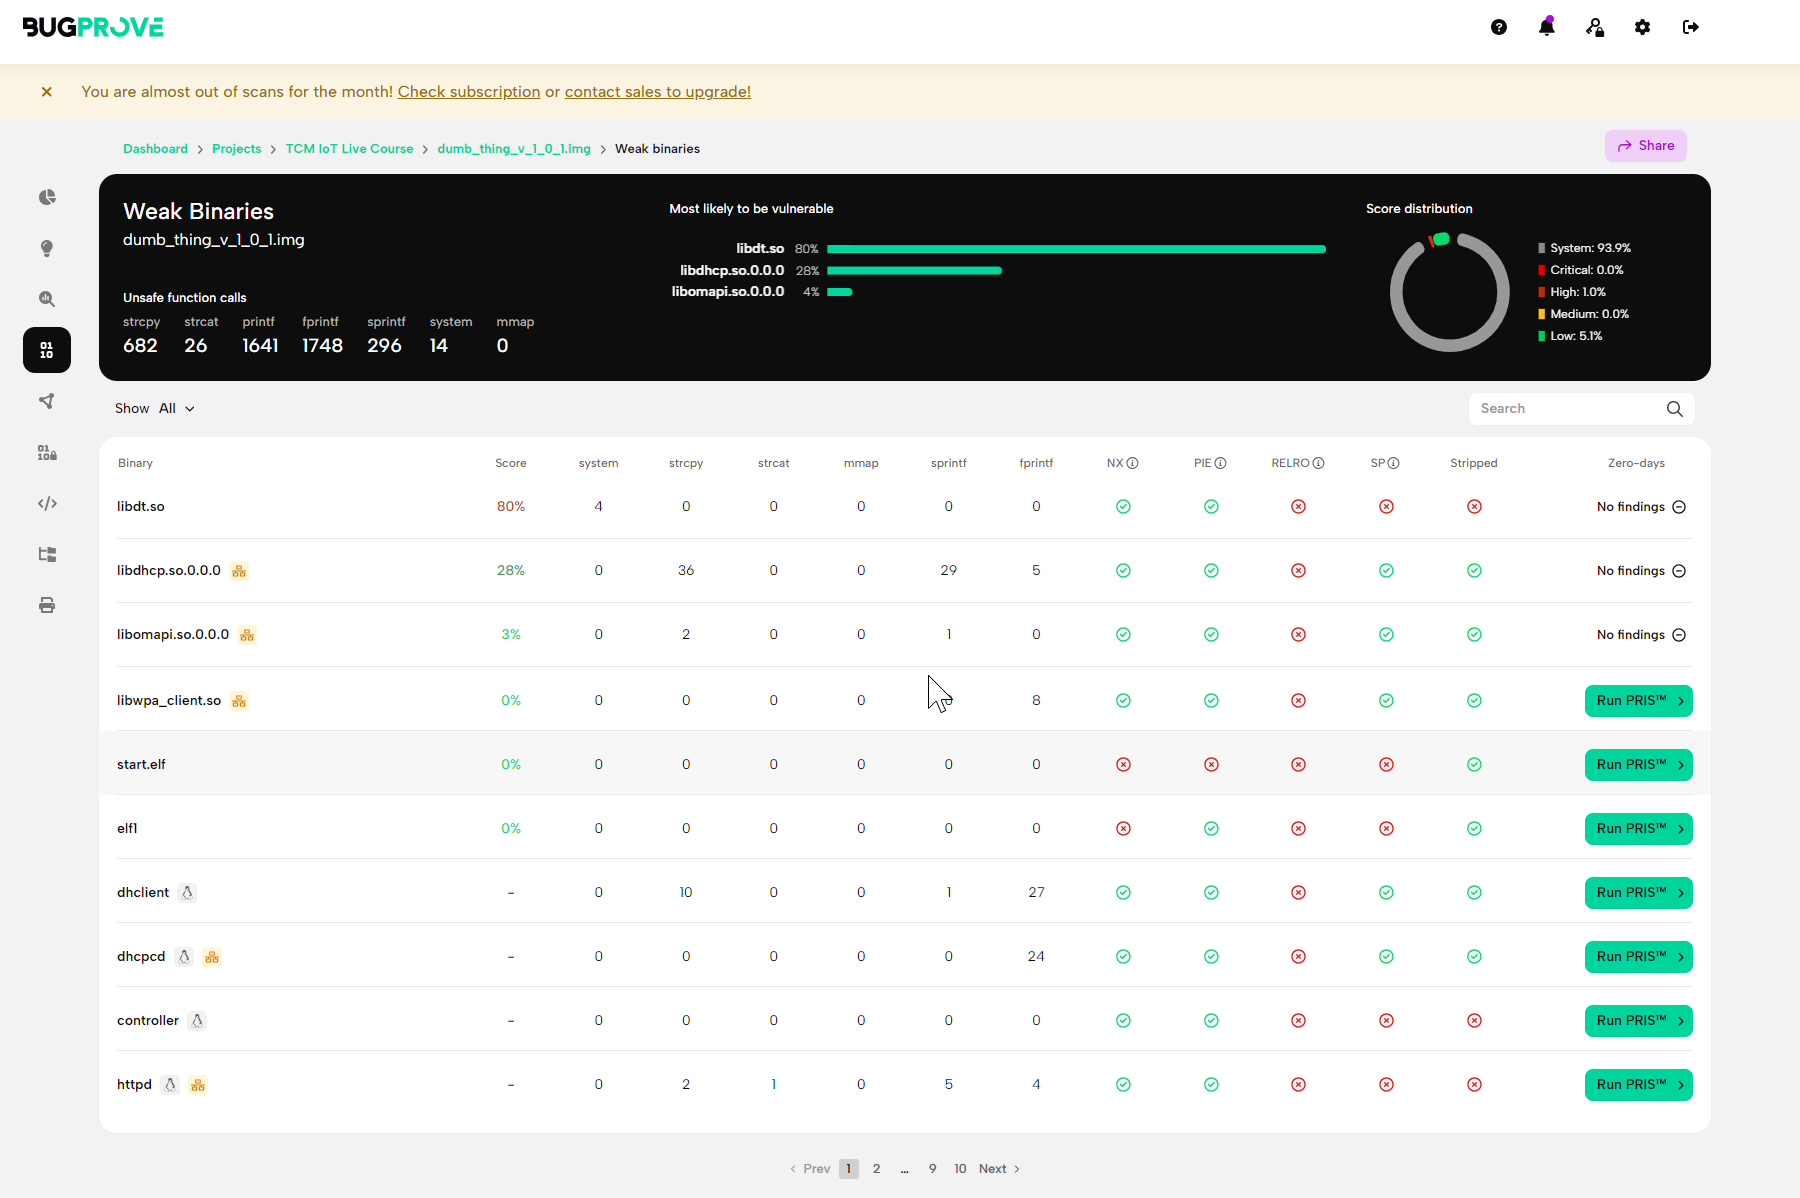
At the very top of the list is libdt.so, .so files are shared object files, these are libraries that allow multiple binaries to make use of shared functionality. We can see this file is flagged for having 4 system calls in it. This is the next thing we’ll investigate in the final part of this series where we take a look at reverse engineering this shared object and the httpd binary.
Wrapping Up
In this third installment of “Getting Started with IoT and Hardware Hacking” we enumerated the firmware on a Raspberry Pi using several analysis tricks and tools. Now that we have these pieces in hand, part 4 will dive into how to reverse engineer some of these findings to expose a vulnerability. Stay tuned!
If you’ve enjoyed everything so far, and are looking for more training, check out our Beginner’s Guide to IoT and Hardware Hacking at the TCM Academy!

About the Author: Andrew Bellini
My name is Andrew Bellini and I sometimes go as DigitalAndrew on social media. I’m an electrical engineer by trade with a bachelor’s degree in electrical engineering and am a licensed Professional Engineer (P. Eng) in Ontario, Canada. While my background and the majority of my career has been in electrical engineering, I am also an avid and passionate ethical hacker.
I am the instructor of our Beginner’s Guide to IoT and Hardware Hacking course and I also created the Practical IoT Pentest Associate (PIPA) certification.
In addition to my love for all things ethical hacking, cybersecurity, CTFs and tech I also am a dad, play guitar and am passionate about the outdoors and fishing.
About TCM Security
TCM Security is a veteran-owned, cybersecurity services and education company founded in Charlotte, NC. Our services division has the mission of protecting people, sensitive data, and systems. With decades of combined experience, thousands of hours of practice, and core values from our time in service, we use our skill set to secure your environment. The TCM Security Academy is an educational platform dedicated to providing affordable, top-notch cybersecurity training to our individual students and corporate clients including both self-paced and instructor-led online courses as well as custom training solutions. We also provide several vendor-agnostic, practical hands-on certification exams to ensure proven job-ready skills to prospective employers.
Pentest Services: https://tcmdev.tcmsecurity.com/our-services/
Follow Us: Blog | LinkedIn | YouTube | Twitter | Facebook | Instagram
Contact Us: sales@tcm-sec.com
See How We Can Secure Your Assets
Let’s talk about how TCM Security can solve your cybersecurity needs. Give us a call, send us an e-mail, or fill out the contact form below to get started.

